How to Make Fluffy Yeasted Waffles Fast
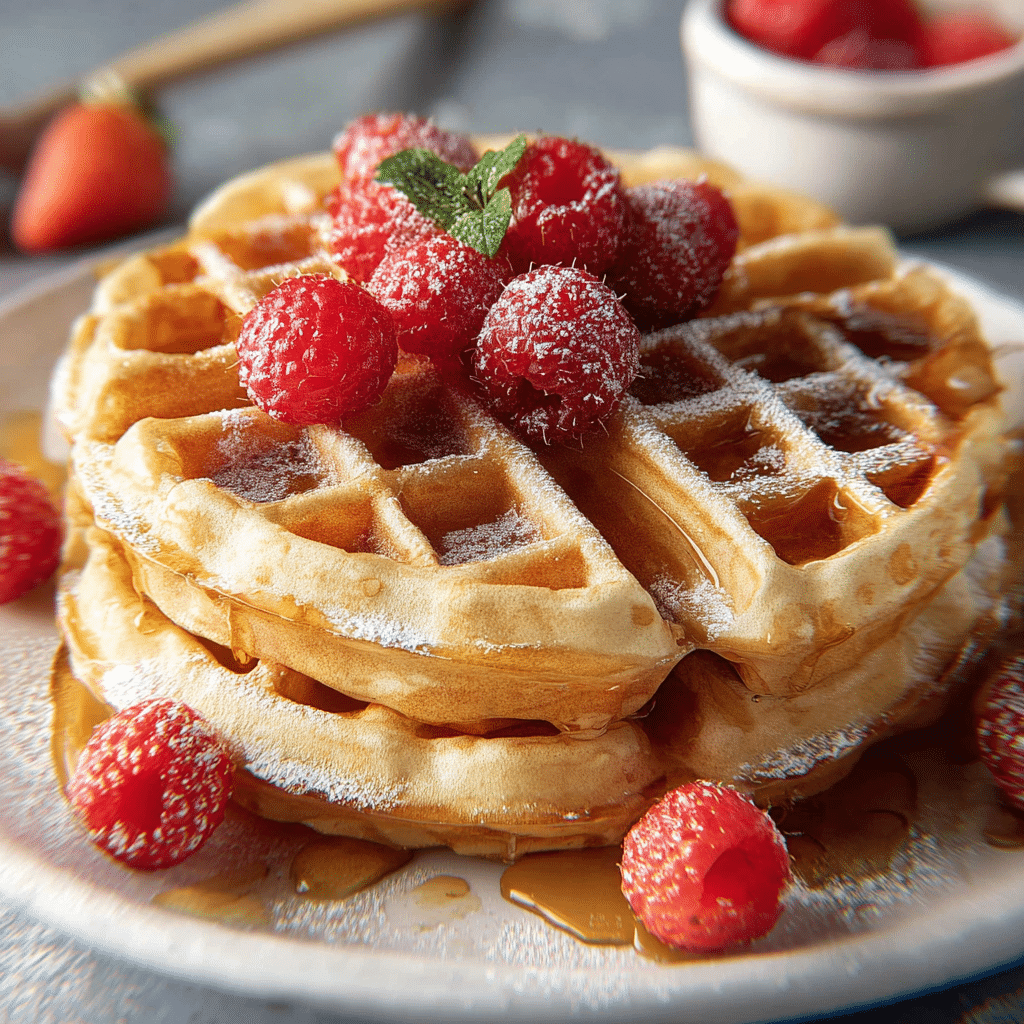
If you’re on a quest to find the ultimate breakfast or brunch treat, look no further than yeasted waffles. These beauties combine the light, airy texture credited to yeast fermentation with a quick prep that gets them on your table fast. Yeasted waffles boast a perfect golden crust with a tender, fluffy interior that feels like a warm hug with every bite. Whether drizzled with syrup, topped with fresh berries, or savored plain, yeasted waffles elevate your morning routine effortlessly.
Why You’ll Love This Recipe
- Light and Airy Texture: Yeast fermentation creates waffles so fluffy, they practically melt in your mouth.
- Quick Preparation: With easy steps and minimal hands-on time, you’ll have waffles ready fast without stress.
- Versatility: These waffles pair wonderfully with both sweet and savory toppings, making them perfect for any meal.
- Simple Ingredients: Uses everyday pantry staples without sacrificing flavor or quality.
- Enhanced Flavor: Yeast adds a subtle depth and gentle tang that’s simply irresistible.
Ingredients You’ll Need
Every ingredient plays a critical role in crafting these flawless yeasted waffles. From creating the perfect rise to delivering rich flavor and golden color, this simple list is your ticket to waffle bliss.
- Active Dry Yeast: Essential for fermentation that produces a light, airy waffle texture.
- All-Purpose Flour: Provides structure, ensuring a tender crumb while holding the waffle’s shape.
- Sugar: Feeds the yeast and adds a touch of sweet balance to the batter.
- Milk: Hydrates the flour and activates the yeast, also contributes to a rich flavor.
- Eggs: Bind ingredients together while adding moisture and contributing to lift.
- Melted Butter: Delivers richness and promotes a crispy, golden exterior.
- Salt: Enhances all the flavors, tying the recipe together perfectly.
- Vanilla Extract (optional): Adds a subtle aromatic touch that complements the yeast’s natural tang.
Variations for Yeasted Waffles
Feel free to customize this yeasted waffles recipe to suit your taste buds or dietary needs. Swapping ingredients or adding extras is a breeze and lets you get creative with your breakfast or brunch.
- Gluten-Free Twist: Use a gluten-free flour blend for a waffle option friendly to gluten sensitivities.
- Whole Wheat Upgrade: Swap half the all-purpose flour for whole wheat to boost fiber and add nuttiness.
- Cinnamon and Spice: Add a teaspoon of ground cinnamon or pumpkin pie spice for warming flavor notes.
- Chocolate Chip Delight: Stir in chocolate chips just before cooking for a sweet, gooey surprise.
- Dairy-Free Version: Substitute plant-based milk and oil instead of butter for a vegan-friendly waffle.

How to Make Yeasted Waffles
Step 1: Activate the Yeast
Begin by warming the milk to lukewarm temperature—this is crucial to wake up the yeast without killing it. Stir in a pinch of sugar and sprinkle the yeast on top, letting it sit for 5 to 10 minutes until it becomes frothy and bubbly, signaling the yeast is alive and ready.
Step 2: Mix the Wet Ingredients
In a large bowl, whisk together the eggs, melted butter, and vanilla extract if using. Slowly pour in the activated yeast mixture, combining them gently but thoroughly for a smooth base.
Step 3: Combine Dry Ingredients
In a separate bowl, sift the all-purpose flour, sugar, and salt. This avoids clumps and ensures an even distribution of leavening and seasoning throughout your batter.
Step 4: Make the Batter
Gradually add the dry ingredients to the wet mixture, stirring carefully until just combined. Aim for a slightly thick but pourable batter—this consistency helps produce waffles that are crisp outside yet soft inside.
Step 5: Let the Batter Rise
Cover the batter with a clean towel and leave it in a warm spot for 30 to 45 minutes. During this time, the yeast ferments and the batter puffs up, creating air bubbles that lead to fluffy waffles.
Step 6: Cook the Waffles
Preheat your waffle iron and lightly grease it with butter or cooking spray. Pour enough batter to cover the waffle grid, then close and cook according to your waffle iron’s instructions—usually about 3-5 minutes—until golden brown and crisp.
Pro Tips for Making Yeasted Waffles
- Perfect Temperature: Ensure your milk is about 100 to 110°F to activate yeast without overheating.
- Don’t Overmix: Stir ingredients until combined; overmixing can develop gluten and result in tough waffles.
- Rest Well: Give the batter adequate time to rise for maximum fluffiness and flavor.
- Preheat Properly: Always preheat and lightly grease your waffle iron for crisp waffles and easy release.
- Keep Warm: Place cooked waffles on a wire rack in a warm oven to prevent sogginess while you finish the batch.
How to Serve Yeasted Waffles
Garnishes
Sprinkle powdered sugar, drizzle maple syrup or honey, or add fresh fruits like blueberries, strawberries, and banana slices for a fresh and colorful touch. Whipped cream or yogurt also pairs beautifully for an indulgent yet light finish.
Side Dishes
Pair yeasted waffles with crispy bacon, sausage links, or scrambled eggs to build a hearty brunch or breakfast plate. A simple green salad or fresh fruit salad brings brightness if you prefer a lighter accompaniment.
Creative Ways to Present
Stack your waffles with layers of yogurt and fruit between them to create waffle parfaits. Alternatively, cut waffles into bite-sized pieces and toss with cinnamon sugar or seasonings for waffle bites, perfect for sharing or dipping into sauces.
Make Ahead and Storage
Storing Leftovers
Cool any leftover yeasted waffles completely before placing them in an airtight container. Stored in the refrigerator, they last up to 3 days while maintaining great texture.
Freezing
For longer freshness, freeze cooled waffles by layering them between sheets of parchment paper in a freezer-safe bag or container. They freeze well for up to 2 months without losing flavor or crispness.
Reheating
Reheat waffles in a toaster or oven at 350°F for 5 to 10 minutes until warmed through and crisp on the outside. Avoid microwaving as it can make them soggy instead of crunchy.
FAQs
What makes yeasted waffles different from regular waffles?
Yeasted waffles use yeast to ferment the batter, which creates more air bubbles and a naturally lighter, fluffier texture compared to waffles made with baking powder or baking soda.
Can I make yeasted waffles without waiting for the batter to rise?
Waiting for the batter to rise is key for developing flavor and fluffiness. While you can cook immediately, the texture will be denser and less airy.
How long can I store yeasted waffle batter before cooking?
You can refrigerate the batter for up to 24 hours, but make sure it’s covered well to prevent drying out and use it within that time for best results.
Are yeasted waffles gluten-free?
The classic recipe uses all-purpose flour, which contains gluten, but you can swap in gluten-free flour blends to make them safe for gluten-sensitive diets.
Do I need a special waffle iron for yeasted waffles?
No special waffle iron is required. Any standard waffle maker will work perfectly for cooking yeasted waffles to golden, crisp perfection.
Final Thoughts
Yeasted waffles bring a delightful twist to your breakfast or brunch table, combining a cloud-like texture with quick preparation and endlessly delicious possibilities. Give this recipe a try and discover how simple it is to make a waffle that feels truly special—your mornings will never be the same!