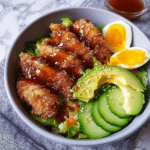
Crispy Japanese Katsu Bowls

If you’ve ever craved a meal that’s both comforting and exciting, then you’re in for a treat with Crispy Japanese Katsu Bowls. This dish combines perfectly crunchy, golden breaded cutlets with a bed of warm, fluffy rice and fresh veggies, making every bite a burst of texture and flavor. Discover the secret to Crispy Japanese Katsu Bowls with this easy, flavorful recipe perfect for a quick and delicious meal today!
Why You’ll Love This Recipe
- Ultimate Comfort Food: Crispy Japanese Katsu Bowls have that satisfying crunch paired with tender meat that hits all the right spots.
- Simple Ingredients: The recipe uses everyday ingredients that come together effortlessly to create something extraordinary.
- Quick to Make: Ideal for busy weeknights, you can have a restaurant-quality meal on your table in under 40 minutes.
- Customizable to Taste: Whether you prefer chicken, pork, or even a vegetarian version, it’s easy to tweak this recipe for your preferences.
- Perfect for Meal Prep: It stores well and reheats beautifully, making it a smart option for planning ahead.
Ingredients You’ll Need
The beauty of Crispy Japanese Katsu Bowls lies in its straightforward yet impactful ingredients. Each component plays a key role, from achieving that perfect crunch to balancing flavors and adding vibrant colors.
- Boneless Chicken or Pork Cutlets: The star of the dish, ideally tender and thinly sliced for quick cooking and maximum crispiness.
- Panko Breadcrumbs: These Japanese-style breadcrumbs create that signature light, airy crunch that you can’t get with regular breadcrumbs.
- All-Purpose Flour: Helps the coating stick to the cutlets, ensuring every bite is crispy.
- Eggs: Acts as the perfect binding agent to hold flour and panko onto the meat.
- Cooked Japanese Rice: Sticky and soft, forming the comforting base for the bowl.
- Katsu Sauce: A rich, tangy condiment combining sweetness and umami that elevates the dish.
- Vegetables like Cabbage and Green Onions: For freshness and crunch to balance the richness of the katsu.
- Neutral Oil for Frying: Such as vegetable or canola oil, which has a high smoke point perfect for deep frying.
Variations for Crispy Japanese Katsu Bowls
One of the best parts about Crispy Japanese Katsu Bowls is just how adaptable the recipe is. You can easily customize it depending on your dietary preferences or what you have on hand.
- Chicken or Pork: Switch between these proteins depending on your taste or what’s available.
- Vegetarian Katsu: Use thick slices of eggplant, tofu, or cauliflower in place of meat for a plant-based twist.
- Spicy Katsu Sauce: Add a splash of sriracha or chili paste to the sauce for an added kick.
- Brown Rice or Quinoa: Substitute rice with other grains to increase fiber and nutrients.
- Extra Veggies: Add carrots, cucumbers, or radishes for additional crunch and color.

How to Make Crispy Japanese Katsu Bowls
Step 1: Prepare Your Ingredients
Start by slicing the chicken or pork into cutlets about half an inch thick. Prepare your flour, lightly beaten eggs, and panko breadcrumbs in separate shallow dishes for the breading process.
Step 2: Bread the Cutlets
Coat each cutlet first with flour, shaking off the excess. Next, dip it into the beaten eggs, and finally press into the panko breadcrumbs until fully coated, ensuring an even crunch.
Step 3: Fry Until Golden and Crispy
Heat neutral oil in a deep pan to about 350°F (175°C). Carefully fry the coated cutlets for 3-4 minutes per side or until they turn a perfect golden brown. Remove and drain on paper towels to keep crisp.
Step 4: Prepare the Rice and Veggies
While frying, make sure your Japanese rice is cooked and fluffy. Thinly slice cabbage and chop green onions to add as fresh toppings to the bowls.
Step 5: Assemble Your Katsu Bowls
Start with a generous bed of warm rice in each bowl, arrange the sliced katsu on top, then pile on the cabbage and green onions. Drizzle with katsu sauce and enjoy!
Pro Tips for Making Crispy Japanese Katsu Bowls
- Use Panko Breadcrumbs: They’re the key to achieving that irresistible light crunch.
- Maintain Oil Temperature: Keep the frying oil steady at 350°F for even cooking and preventing soggy breading.
- Do Not Overcrowd the Pan: Fry cutlets in batches to ensure oil temperature remains consistent.
- Rest Cutlets After Frying: Let them sit for a few minutes on a wire rack to keep the breading crisp.
- Make Your Own Katsu Sauce: Combining Worcestershire sauce, ketchup, soy sauce, and a touch of sugar makes a richer, fresher sauce.
How to Serve Crispy Japanese Katsu Bowls
Garnishes
Add a sprinkle of toasted sesame seeds or chopped parsley for extra aroma and visual appeal. Thinly sliced pickled ginger also adds a lovely zing that cuts through the richness.
Side Dishes
Classic miso soup or a simple cucumber salad with rice vinegar complements the flavors perfectly while keeping the meal balanced and refreshing.
Creative Ways to Present
Serve the katsu cutlets fanned out over the rice for an elegant look or stack them to create a layered bowl. Using small ceramic bowls or bamboo trays enhances the authentic Japanese experience.
Make Ahead and Storage
Storing Leftovers
Store any leftover crispy cutlets and rice in an airtight container in the refrigerator for up to 3 days. Keep the sauce separate to prevent sogginess.
Freezing
If you want to keep katsu longer, wrap the fried cutlets tightly in plastic wrap and place them in a freezer-safe bag. They freeze well for up to one month.
Reheating
To bring back that crunch, reheat the cutlets in an oven or air fryer at 350°F for 8-10 minutes instead of the microwave, which tends to make the breading soggy.
FAQs
Can I use chicken thighs instead of chicken breasts?
Absolutely! Chicken thighs tend to be juicier and more flavorful, which works wonderfully for Crispy Japanese Katsu Bowls. Just slice them into cutlets of similar thickness for even cooking.
Is it necessary to deep fry the katsu?
While deep frying gives the crispiest texture, you can pan-fry in a good amount of oil or even bake the cutlets for a lighter version, though the crunch will be slightly less pronounced.
What makes Japanese rice different for this dish?
Japanese rice is short-grain and sticky, which helps it hold together nicely in the bowl, creating a perfect base to soak up the delicious katsu sauce.
Can I make katsu sauce from scratch?
Yes! A quick homemade katsu sauce combines Worcestershire sauce, ketchup, soy sauce, and a bit of sugar or honey for balance—it tastes fresher and allows you to adjust sweetness and tanginess.
What vegetarian options work best in place of meat?
Try eggplant slices, firm tofu, or cauliflower florets breaded and fried just like traditional katsu for satisfying vegetarian Crispy Japanese Katsu Bowls.
Final Thoughts
Making Crispy Japanese Katsu Bowls at home is an absolute joy that rewards you with crunchy, flavorful bites and warm comfort. It’s perfect for any day you want a meal that feels both special and simple. So grab your ingredients, fire up your stove, and treat yourself to this beloved Japanese classic today!
Related Posts
PrintCrispy Japanese Katsu Bowls
Crispy Japanese Katsu Bowls combine golden, crunchy breaded cutlets with fluffy Japanese rice and fresh vegetables, offering a comforting yet exciting meal with layers of texture and flavor. Perfectly crispy on the outside and tender inside, these bowls are quick to prepare, customizable to your taste, and ideal for meal prep or weeknight dinners.
- Prep Time: 15 minutes
- Cook Time: 20 minutes
- Total Time: 35 minutes
- Yield: 4 servings 1x
- Category: Main Course
- Method: Deep Frying
- Cuisine: Japanese
- Diet: Contains Gluten
Ingredients
Main Ingredients
- 4 boneless chicken or pork cutlets (about 1/2 inch thick)
- 1 cup panko breadcrumbs
- 1/2 cup all-purpose flour
- 2 large eggs, lightly beaten
- 3 cups cooked Japanese rice
- 1 cup finely shredded cabbage
- 2 green onions, thinly sliced
- 1/2 cup katsu sauce (store-bought or homemade)
- 2 cups neutral oil (vegetable or canola) for frying
Optional Ingredients and Variations
- Eggplant slices, tofu, or cauliflower florets for vegetarian katsu option
- Sriracha or chili paste for spicy katsu sauce
- Brown rice or quinoa as a rice substitute
- Additional vegetables: carrots, cucumbers, radishes
- Toasted sesame seeds or chopped parsley for garnish
- Pickled ginger as a garnish
Homemade Katsu Sauce Ingredients (Optional)
- 3 tablespoons Worcestershire sauce
- 3 tablespoons ketchup
- 1 tablespoon soy sauce
- 1 teaspoon sugar or honey
Instructions
- Prepare Your Ingredients: Slice the chicken or pork into cutlets about half an inch thick. Set up three shallow dishes: one with all-purpose flour, one with lightly beaten eggs, and one with panko breadcrumbs for breading.
- Bread the Cutlets: Coat each cutlet first with flour, shaking off any excess. Then dip it into the beaten eggs, followed by pressing it firmly into the panko breadcrumbs until well coated on all sides for an even, crisp crust.
- Fry Until Golden and Crispy: Heat the neutral oil in a deep pan to 350°F (175°C). Fry each breaded cutlet carefully for 3-4 minutes per side until golden brown and crispy. Remove and place on paper towels or a wire rack to drain excess oil and maintain crispness.
- Prepare the Rice and Vegetables: While frying, ensure the Japanese rice is cooked and fluffy. Thinly slice cabbage and chop green onions to add fresh, crunchy toppings to the bowls.
- Assemble Your Katsu Bowls: Place a generous serving of warm rice into each bowl, top with sliced katsu cutlets, then layer shredded cabbage and green onions. Drizzle the entire bowl with katsu sauce and enjoy immediately.
Notes
- Use panko breadcrumbs for the lightest, crunchiest coating.
- Maintain the frying oil temperature at 350°F (175°C) for even cooking and to prevent soggy breading.
- Do not overcrowd the pan while frying; cook in batches to keep oil temperature consistent.
- Rest fried cutlets on a wire rack for a few minutes to help retain crispness.
- Make your own katsu sauce by combining Worcestershire sauce, ketchup, soy sauce, and a bit of sugar for fresher flavor and to adjust sweetness and tanginess.
- To reheat leftovers, use an oven or air fryer at 350°F for 8-10 minutes to restore the crispy texture.
Nutrition
- Serving Size: 1 bowl (approx. 1 cutlet with rice and veggies)
- Calories: 550 kcal
- Sugar: 6 g
- Sodium: 780 mg
- Fat: 22 g
- Saturated Fat: 5 g
- Unsaturated Fat: 15 g
- Trans Fat: 0 g
- Carbohydrates: 55 g
- Fiber: 3 g
- Protein: 30 g
- Cholesterol: 110 mg
Keywords: Japanese katsu, crispy cutlets, katsu bowls, breaded cutlets, Japanese comfort food, easy dinner, chicken katsu, pork katsu, panko breadcrumbs